---
title: HOW TO MAKE A POSTER IN PHOTOSHOP!
description: Adobe Photoshop has all the tools you need to make any idea real. Here's a tutorial on how to make a poster in Photoshop!
---
Future Media Concepts, Inc.
Est. 1994
- [Home](https://www.fmctraining.com/)
- [Why FMC?](https://www.fmctraining.com/why-fmc)
- [Blog](https://blog.fmctraining.com/blog)
- [Browse Courses](https://www.fmctraining.com/browse-courses)
- Locations ▾
- [FMC Online](https://www.fmctraining.com/online-training/)
- [On-site](https://www.fmctraining.com/on-site)
- [Contact](https://www.fmctraining.com/contact-fmc)
- [LIVE CHAT](https://www.fmctraining.com/live-chat)
# Classroom in a Blog
# HOW TO MAKE A POSTER IN PHOTOSHOP!
By [Katie Houghton](https://blog.fmctraining.com/blog/author/katie-houghton) on June 27, 2019
- [Tweet](https://twitter.com/share)
Creating a poster can be done in [Photoshop](https://blog.fmctraining.com/blog/what-is-adobe-photoshop-ps), Illustrator, InDesign, or even in all three.
Today with paragraph and character styles there may be little reason to leave Photoshop in the first place. The steps of designing still remain the same in Photoshop, the difference is that you will not need to learn how to navigate through a lot of extra applications to create a fun and engaging poster.
Follow this step-by-step tutorial on how to make a poster in Photoshop!
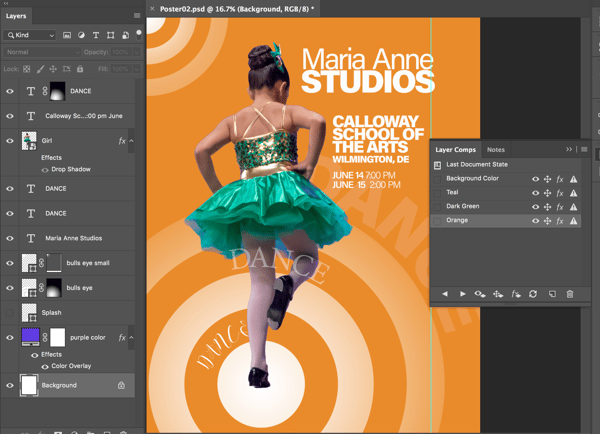
**How to make a poster in Photoshop -Step 1: Figuring Out the Size, Color Mode, and Resolution**
Canvases come in all sizes, resolutions, and color modes but determining your ideal canvas is dependent on the project you are going to start. It is important that you make the poster the size and resolution you need for output. Most posters are at these sizes: 22" x 28" , 24" x 36", 36" x 48”.
Photographs for print should be a minimum of 300 ppi for a high-end print job. For lower-end printing (office postscript printers) your resolution may be as low as 150 ppi. The resolution is based on the LPI of the printer so check before the project is started.
If you are not sure 300 ppi is the magic number. Our color mode will always start in RGB with usually a working color profile of sRGB. Sometimes based on the printing process, the RGB color mode may need to be converted to a CMYK color mode at the end, but we can always start in RGB and convert color modes later.
**Step 2: Start with a Preset**
Let’s create our canvas!
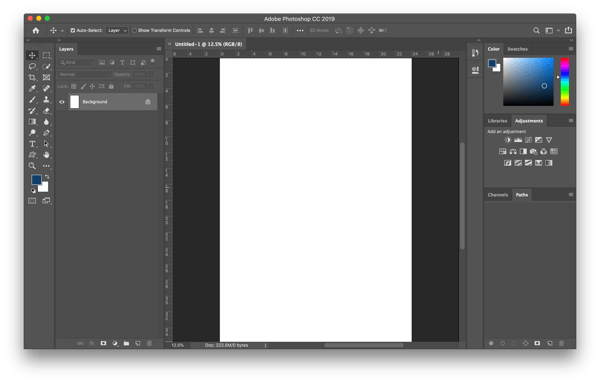
The size of the canvas for this project will be 22”x28”, RGB at 300 ppi. We can use the preset Poster under Art & Illustration, which will set most of these properties. Only the dimensions need to be changed since the preset size for the poster is 18” x 24”. Change the dimensions to 22” x 28”. Before creating the canvas, it is also a good idea to save a Preset for future use. Click on the **Save Preset** button and call the preset “Poster 22x28”. Once the preset is created, click on the **Create** button.
Let’s save it and name it *Poster*.
## **Step 3: Open an Image and Add it to the Poster**
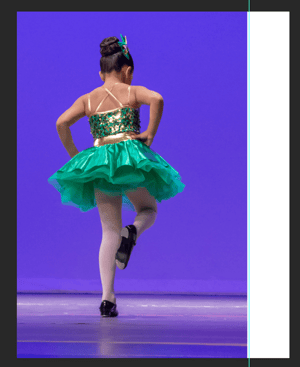Let’s open the image in Photoshop, so when the Smart Object is created the Smart Object will be correct. The flexibility of a Photoshop Smart Object layer is needed vs a limited JPG Smart Object layer. If the image is placed directly in as a Smart Object the layer would be a JPG Smart Object*.* This distinction is important as JPGs can not have alpha channels nor layers ‒ thus limiting our ability to edit the image. Once the image is open, right click the layer and **Duplicate Layer**. In the field for **As:** type *Girl* in the **Destination Document** field and choose the *Poster.psd* file.
## **Step 4: Create a Smart Object and Resize if Needed**
After we have our image duplicated into our project file, right-click on the new layer named *Girl* and **Convert to Smart Object.** *(This will make the image into a Photoshop Smart Object).* We can resize as needed, but make sure to not enlarge the image too much, since the resolution can distort the image in print. If you really need a larger image, find one taken at a higher resolution to keep the quality of the image sharp!
## **Step 5: Add a Background Solid layer**
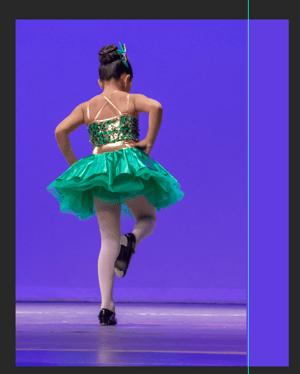Now to create a background for our poster, choose the *Background canvas* layer then click on the **Create New Fill or Adjustment Layer** icon. From the menu select **Solid Color**. Let’s move the mouse to the canvas area to choose a color from the image. At this stage, the *Solid layer* will be hidden from view by the *Girl layer*, but this will change once the girl’s background is cropped out.
## **Step 6: Cut it Out**
To crop out the background in the *Girl layer,* double click on the Smart Object of the *Girl* layer. This action will open a Photoshop Smart Object. Within this project file, choose the **Quick Selection tool**, then use **Select Subject** from the **Options panel**. This option will select too much of the background, but we can refine this!
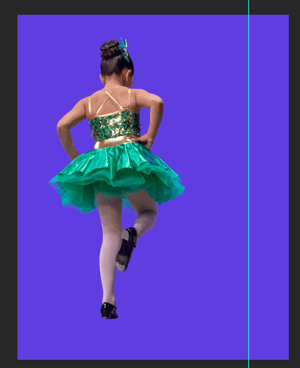
Clean up the selection via **Select and Mask** found in the **Options panel**. Use the **Polygonal tool** and choose **Subtract from selection** from the **Options bar.** Select the highlighted parts in the background that should not be part of the selection.
Use the **Refine Edge Brush tool** to brush over the areas that are partly in and partly out of the selection, which in this case is the tutu and the dancer’s hair. This will make the tutu translucent by subtracting the background color pixels. There will also be no helmet head since the **Refine Edge Brush** tool can keep the hair fly aways by adding them back in.
The final refinements may include choosing to **Smooth** out the path under **Global Refinements** and **Decontaminate Colors** under **Output Setting**.
Once the selection is done. View the selection under **View Mode** to see it under different circumstances. If the selection is satisfactory, can finalize the changes and choose **Out to: New Layer with Layer Mask** under **Output Settings.**
Make sure to save your file before closing the Smart Object! The image will update in the project file after saving.
## **Step 7: Add a Shape Layers**
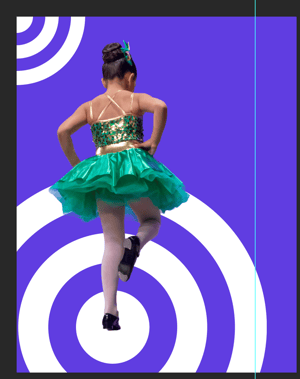Now let’s add some shapes to make the image more dynamic! Choose the *Solid layer* below the *Girl layer*. For large visual graphics, we can add a *Shape Layer* by choosing the **Custom Shape tool** in the **tool palette**. Choose **Shape** from the pop-up menu in the **Options bar**. Here, we can select our desired shape and color to draw. In this case, we are going to use white and the bullseye shape.
## **Step 8: Add a Layer Mask to the Shape**
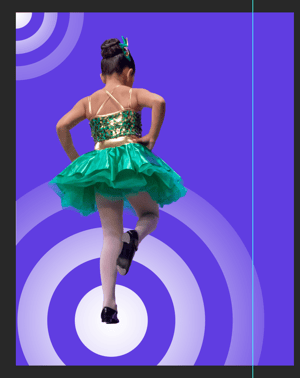To add some effects to our newly created shape, let’s make the object fade near the edges. Let’s add a **layer mask** with nothing selected. This action will create a white layer mask, which will not hide any part of the layer. Next, we can choose the **Gradient tool**. In the **Options bar**, choose **Radial Gradient** as the Style. With the dropdown menu for the **Gradient picker** choose Black, White. Check on **Reverse** in the **Options bar** so it changes to White, Black instead. Make sure the **layer mask** is selected in the **Layers panel** for the *Shape layer*, then click down in the center of the shape and drag out past the shape, only releasing the mouse when you are done drawing the gradient start to stop points.
## **Step 9: Add Point type**
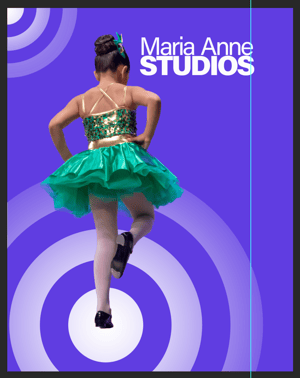After we are done with our design, we can now create the title by clicking down once with the **Type tool**. After you type in your message or title for the poster, select the line of text and change the character settings and paragraph settings. We can create a **Paragraph style** by clicking on the **Create new paragraph style icon** in the **Paragraph Styles panel.** After doing so, hit the return button to create the second line of type. Select the second line of text and change the character settings and paragraph settings. **Continue to create a paragraph style** by following the above steps.
## **Step 10: Add Paragraph type**
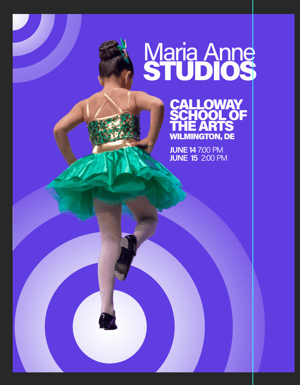To add blocks or lines of text, click and drag to create a bounding area to hold the text. After typing in the first paragraph, change the settings then choose a **Paragraph style** in the **Paragraph Styles panel**. Do the same thing for the next paragraph. The final two paragraphs ended up with the same paragraph style which again is created using the **Paragraph Styles panel.**
If needed, we can also create a Character style for character setting changes in the **Character Styles panel**. In this case a character style was used for creating bold text in the same paragraph.
## **Step 11: Add Type on a Path**
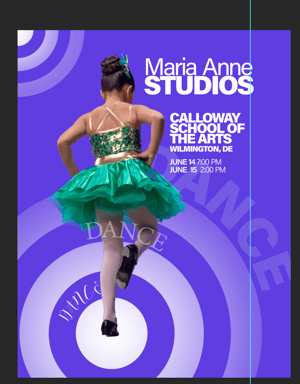To take things up a notch visually, we can also create type along a path instead of having blocks of text throughout the poster. To create type along a path, make sure that there is no shape layer selected. Choose a shape like the ellipse from the tool panel. Make sure **Path** is selected from the drop-down menu in the **Options panel**. Pick a shape to create a path then click on the path with the **Type tool** to put type along this path we just created.
## **Step 12: Add Finishing touches**
We are almost finished with this design! Time for some final details and finishing touches. We can add finishing touches like **Drop Shadow** or other effects using the **Add layer style icon** in the **Layers panel**.
## **Step 13: Use Layer Comps**
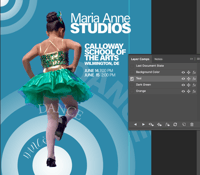
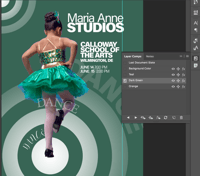
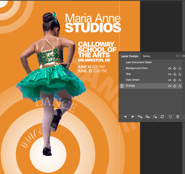
We can make choices about the background using the Layer Comps panel. For example, we can add a **Color Overlay Effect** to the Solid Layer. Each time the Color Overlay is changed *(double click on the effect to make changes to the effect)*, choose to **Create New Layer Comp** from in the **Layer Comps panel.** This will help view different color background choices all in one document.
|  |  |  |
| --- | --- | --- |
***Benefits and Downsides***
The benefits of only using Photoshop for poster design, you will only be working in one application instead of navigating through multiple applications. As long as you keep Photoshop as a Photoshop file or as a PDF file, Photoshop can keep the path and type in vector format, which is ideal for printing. Once you save your project out to another image format, it will become just an image at the resolution of your canvas.
So, if used correctly, Photoshop can be a great alternative to using Illustrator and InDesign, though each program brings something more to the table… that is for another day!
Learning Photoshop can be extremely time-consuming and daunting! Let our professionals teach you how to become a pro with photoshop in our [adobe photoshop classes](https://fmctrainingnetwork.com/adobe/live-classes/#photoshop).
[Subscribe to our YouTube channel for more photoshop tips and tricks!](https://www.youtube.com/channel/UChQatghIr5Aj-kiurJHMnrw)
[Join our Facebook group to be a part of a growing community in the digital world!](https://www.facebook.com/groups/futuremediaconferencesalumni)
Future Media Concepts, Inc.
[Washington DC](https://www.fmctraining.com/washington-dc/) | [Irvine, California](https://www.fmctraining.com/irvine/) | [Orlando, Florida](https://www.fmctraining.com/orlando/) | [Toronto, Canada](https://www.fmctraining.com/toronto/)
Topics: [graphic design](https://blog.fmctraining.com/blog/tag/graphic-design), [shapes](https://blog.fmctraining.com/blog/tag/shapes), [print design](https://blog.fmctraining.com/blog/tag/print-design), [posters](https://blog.fmctraining.com/blog/tag/posters), [adobe photoshop](https://blog.fmctraining.com/blog/tag/adobe-photoshop), [tutorial](https://blog.fmctraining.com/blog/tag/tutorial)
### Author: [Katie Houghton](https://blog.fmctraining.com/blog/author/katie-houghton)
Katherine Houghton is a graduate of the Rochester Institute of Technology with degrees in Graphic Design and Industrial Design. She has held multimedia, graphic design, and consulting positions at numerous companies including KPMG LLP, one of the big five Accounting Consulting Firms where she managed the Multimedia Department. During the ".com" boom of the 90s she was promoted to Vice President of Confidant Inc. where she managed the entire look of all visual materials including their marketing and Internet presence.
Currently, she teaches classes in Premiere Pro, Illustrator, Freehand, Director, Photoshop, InDesign, Quark, After Effects, Final Cut Pro & Acrobat.
FMC provides quality, consistent and accessible training for content creators and IT professionals.
### Our courses are designed to help individuals and institutions meet their goals by enabling them to be on the cutting edge of technology.
[](https://fcpglobalsummit.com/)
[_300x300.jpg "how to make a poster in Photoshop")](https://www.futuremediaconferences.com/recording-bundles/)
### Subscribe to Email Updates
### Recent Posts
### Topics
- [Adobe (42)](https://blog.fmctraining.com/blog/tag/adobe)
- [adobe photoshop (16)](https://blog.fmctraining.com/blog/tag/adobe-photoshop)
- [Adobe After Effects (14)](https://blog.fmctraining.com/blog/tag/adobe-after-effects)
- [Video Editing (14)](https://blog.fmctraining.com/blog/tag/video-editing)
- [Photoshop (13)](https://blog.fmctraining.com/blog/tag/photoshop)
- [Adobe Certification (11)](https://blog.fmctraining.com/blog/tag/adobe-certification)
- [continuing education (11)](https://blog.fmctraining.com/blog/tag/continuing-education)
- [tutorial (11)](https://blog.fmctraining.com/blog/tag/tutorial)
- [Premiere Pro (10)](https://blog.fmctraining.com/blog/tag/premiere-pro)
- [photo editing (10)](https://blog.fmctraining.com/blog/tag/photo-editing)
- [skills (10)](https://blog.fmctraining.com/blog/tag/skills)
- [content creation (9)](https://blog.fmctraining.com/blog/tag/content-creation)
- [graphic design (9)](https://blog.fmctraining.com/blog/tag/graphic-design)
- [training (8)](https://blog.fmctraining.com/blog/tag/training)
- [Adobe Illustrator (7)](https://blog.fmctraining.com/blog/tag/adobe-illustrator)
- [Motion Graphics (7)](https://blog.fmctraining.com/blog/tag/motion-graphics)
- [Premiere Pro Timeline (7)](https://blog.fmctraining.com/blog/tag/premiere-pro-timeline)
- [photography (7)](https://blog.fmctraining.com/blog/tag/photography)
- [premiere pro editing (7)](https://blog.fmctraining.com/blog/tag/premiere-pro-editing)
- [After Effects Masks (6)](https://blog.fmctraining.com/blog/tag/after-effects-masks)
- [Premiere Pro Transitions (6)](https://blog.fmctraining.com/blog/tag/premiere-pro-transitions)
- [animation (6)](https://blog.fmctraining.com/blog/tag/animation)
- [Career Advice (5)](https://blog.fmctraining.com/blog/tag/career-advice)
- [Computer Software (5)](https://blog.fmctraining.com/blog/tag/computer-software)
- [Edit Type (5)](https://blog.fmctraining.com/blog/tag/edit-type)
- [Final Cut Pro (5)](https://blog.fmctraining.com/blog/tag/final-cut-pro)
- [InDesign (5)](https://blog.fmctraining.com/blog/tag/indesign)
- [Top Tips (5)](https://blog.fmctraining.com/blog/tag/top-tips)
- [photo retouching (5)](https://blog.fmctraining.com/blog/tag/photo-retouching)
- [social media (5)](https://blog.fmctraining.com/blog/tag/social-media)
- [After Effects CC Particle World (4)](https://blog.fmctraining.com/blog/tag/after-effects-cc-particle-world)
- [Apple (4)](https://blog.fmctraining.com/blog/tag/apple)
- [Post Production (4)](https://blog.fmctraining.com/blog/tag/post-production)
- [cinematic video (4)](https://blog.fmctraining.com/blog/tag/cinematic-video)
- [motion effects (4)](https://blog.fmctraining.com/blog/tag/motion-effects)
- [shapes (4)](https://blog.fmctraining.com/blog/tag/shapes)
- [After Effects CC RepeTile (3)](https://blog.fmctraining.com/blog/tag/after-effects-cc-repetile)
- [After Effects Clone Stamp Tool (3)](https://blog.fmctraining.com/blog/tag/after-effects-clone-stamp-tool)
- [After Effects Puppet Tool (3)](https://blog.fmctraining.com/blog/tag/after-effects-puppet-tool)
- [After Effects Repeater (3)](https://blog.fmctraining.com/blog/tag/after-effects-repeater)
- [FCPX (3)](https://blog.fmctraining.com/blog/tag/fcpx)
- [Premiere Pro Adjustment Layers (3)](https://blog.fmctraining.com/blog/tag/premiere-pro-adjustment-layers)
- [Premiere Pro Masks (3)](https://blog.fmctraining.com/blog/tag/premiere-pro-masks)
- [filmmaking (3)](https://blog.fmctraining.com/blog/tag/filmmaking)
- [print design (3)](https://blog.fmctraining.com/blog/tag/print-design)
- [video transitions (3)](https://blog.fmctraining.com/blog/tag/video-transitions)
- [3D Artist (2)](https://blog.fmctraining.com/blog/tag/3d-artist)
- [Adobe Lightroom (2)](https://blog.fmctraining.com/blog/tag/adobe-lightroom)
- [Apple Training (2)](https://blog.fmctraining.com/blog/tag/apple-training)
- [Audio Mixing (2)](https://blog.fmctraining.com/blog/tag/audio-mixing)
- [Blackmagic (2)](https://blog.fmctraining.com/blog/tag/blackmagic)
- [Employment (2)](https://blog.fmctraining.com/blog/tag/employment)
- [Marketing (2)](https://blog.fmctraining.com/blog/tag/marketing)
- [Premiere Pro Text Styles (2)](https://blog.fmctraining.com/blog/tag/premiere-pro-text-styles)
- [adobe illustrator live shapes (2)](https://blog.fmctraining.com/blog/tag/adobe-illustrator-live-shapes)
- [imovie (2)](https://blog.fmctraining.com/blog/tag/imovie)
- [iphone (2)](https://blog.fmctraining.com/blog/tag/iphone)
- [masks (2)](https://blog.fmctraining.com/blog/tag/masks)
- [text (2)](https://blog.fmctraining.com/blog/tag/text)
- [training benefits (2)](https://blog.fmctraining.com/blog/tag/training-benefits)
- [vector graphics (2)](https://blog.fmctraining.com/blog/tag/vector-graphics)
- [visual storyteller (2)](https://blog.fmctraining.com/blog/tag/visual-storyteller)
- [Apple IT (1)](https://blog.fmctraining.com/blog/tag/apple-it)
- [Cinematic VR (1)](https://blog.fmctraining.com/blog/tag/cinematic-vr)
- [Clone Stamp Tool (1)](https://blog.fmctraining.com/blog/tag/clone-stamp-tool)
- [Email (1)](https://blog.fmctraining.com/blog/tag/email)
- [Gaming Development (1)](https://blog.fmctraining.com/blog/tag/gaming-development)
- [Livestreaming (1)](https://blog.fmctraining.com/blog/tag/livestreaming)
- [News (1)](https://blog.fmctraining.com/blog/tag/news)
- [Production (1)](https://blog.fmctraining.com/blog/tag/production)
- [Spin Down Effect (1)](https://blog.fmctraining.com/blog/tag/spin-down-effect)
- [Tint Color (1)](https://blog.fmctraining.com/blog/tag/tint-color)
- [UAV / Drones (1)](https://blog.fmctraining.com/blog/tag/uav-drones)
- [UAV certification (1)](https://blog.fmctraining.com/blog/tag/uav-certification)
- [Unity (1)](https://blog.fmctraining.com/blog/tag/unity)
- [Unity Game Engine (1)](https://blog.fmctraining.com/blog/tag/unity-game-engine)
- [content aware tool (1)](https://blog.fmctraining.com/blog/tag/content-aware-tool)
- [drone certification (1)](https://blog.fmctraining.com/blog/tag/drone-certification)
- [drone video (1)](https://blog.fmctraining.com/blog/tag/drone-video)
- [drone workshop (1)](https://blog.fmctraining.com/blog/tag/drone-workshop)
- [frame hold (1)](https://blog.fmctraining.com/blog/tag/frame-hold)
- [frame rates (1)](https://blog.fmctraining.com/blog/tag/frame-rates)
- [freeze frame (1)](https://blog.fmctraining.com/blog/tag/freeze-frame)
- [hands-on workshop (1)](https://blog.fmctraining.com/blog/tag/hands-on-workshop)
- [healing brush tool (1)](https://blog.fmctraining.com/blog/tag/healing-brush-tool)
- [keyframes adjustments (1)](https://blog.fmctraining.com/blog/tag/keyframes-adjustments)
- [kinetic typography (1)](https://blog.fmctraining.com/blog/tag/kinetic-typography)
- [patch tool (1)](https://blog.fmctraining.com/blog/tag/patch-tool)
- [post production world (1)](https://blog.fmctraining.com/blog/tag/post-production-world)
- [posters (1)](https://blog.fmctraining.com/blog/tag/posters)
- [ppw (1)](https://blog.fmctraining.com/blog/tag/ppw)
- [slow motion clips (1)](https://blog.fmctraining.com/blog/tag/slow-motion-clips)
- [smart confirm (1)](https://blog.fmctraining.com/blog/tag/smart-confirm)
- [spot healing brush tool (1)](https://blog.fmctraining.com/blog/tag/spot-healing-brush-tool)
- [time remapping (1)](https://blog.fmctraining.com/blog/tag/time-remapping)
- [time warp (1)](https://blog.fmctraining.com/blog/tag/time-warp)
- [video on demand (1)](https://blog.fmctraining.com/blog/tag/video-on-demand)
See all
### Training
- [Browse Courses](https://www.fmctraining.com/browse-courses)
- [Certification](https://www.fmctraining.com/certification)
- [Register](https://www.fmctraining.com/register)
- [Site Map](https://https://www.fmctraining.com/site-map)
### Methods
- [In-Class](https://www.fmctraining.com/in-class-training)
- [Online](https://www.fmctraining.com/online-training)
- [On-Site](https://www.fmctraining.com/on-site)
- [Conferences](https://www.fmctraining.com/conferences)
### Pricing
- [Government Rates](https://www.fmctraining.com/gsa)
- [Corporate Rates](https://www.fmctraining.com/corporate-passport-program)
- [Educational Rates](https://www.fmctraining.com/educational-institutions)
### About
- [Our Story](https://www.fmctraining.com/why-fmc)
- [Contact](https://www.fmctraining.com/contact-fmc)
- [Instructors](https://www.fmctraining.com/instructors)
- [Testimonials](https://www.fmctraining.com/testimonials)
- [Awards](https://www.fmctraining.com/awards)
- [News Room](https://www.fmctraining.com/press)
- [Join Our Team](https://www.fmctraining.com/join-our-team)
- [Partners](https://www.fmctraining.com/partners)
- [Cancellation Policy](https://www.fmctraining.com/terms-and-conditions)
- [Privacy Policy](https://www.fmctraining.com/privacy-policy)
### Connect
- [](http://www.facebook.com/futuremediaconcepts)
- [](http://www.twitter.com/FMCtraining)
- [](http://www.vimeo.com/futuremediaconcepts)
- [](https://www.linkedin.com/company/future-media-concepts)
**Toll Free**: 877.362.8724
### Technology Partner:
[](http://www.dell.com/en-us/)
### Affiliations
- [](https://www.fmctraining.com/apple)
- [](https://www.fmctraining.com/adobe)
- [](https://www.fmctraining.com/avid)
- [](https://www.fmctraining.com/autodesk)
- [](https://www.fmctraining.com/blackmagic)
- [](https://www.fmctraining.com/newtek)
- [](https://www.fmctraining.com/press/2013-05-29)
- [](https://www.fmctraining.com/gsa)
- [](https://www.fmctraining.com/press/2009-08-15)
- 
If you are vision-impaired or have some other disability under the Americans with Disabilities Act or a similar law, and you wish to discuss potential accommodations related to using the Future Media Concepts website, please contact [joeln@fmctraining.com](mailto:joeln@fmctraining.com)
© Future Media Concepts, Inc | Est. 1994
```json
{
"@context" : "http://schema.org",
"@type" : "BlogPosting",
"author" : {
"@type" : "Person",
"name" : "Katie Houghton"
},
"dateModified" : "June 10, 2022, 3:17:48 AM",
"datePublished" : "2019-06-27 19:30:10",
"description" : "Adobe Photoshop has all the tools you need to make any idea real. Here's a tutorial on how to make a poster in Photoshop!",
"headline" : "HOW TO MAKE A POSTER IN PHOTOSHOP!",
"image" : {
"@type" : "ImageObject",
"url" : ""
},
"mainEntityOfPage" : {
"@id" : "https://blog.fmctraining.com/blog/creating-a-poster-using-only-photoshop",
"@type" : "WebPage"
},
"publisher" : {
"@type" : "Organization",
"logo" : {
"@type" : "ImageObject",
"url" : "https://4023639.fs1.hubspotusercontent-na1.net/hubfs/4023639/fmc_logo_horizontal_light.png"
},
"name" : "Future Media Concepts"
}
}
```